In a world where mobile banking apps, online bill pay and electronic transfers rule, you can still receive a hardcopy check. You might be wondering, “where do I sign a check?” Sadly, digital technology and online banking have pushed the art of check writing to the side, but you still need to know your way around a paper check.
It's important to know how to properly endorse a check to avoid delays and have the funds deposited into your checking account quickly. Erroneous check endorsements can have legal implications and cause problems for both the remitter and the payee. It is important to endorse a check properly within the designated area on the back and to comply with the guidelines of your financial institution. Some institutions may not accept third-party endorsements or may require additional documentation. When endorsing a check with multiple names, be clear about who can cash it by using the appropriate wording. Some institutions may ask for an account number to be written on the endorsement, while others discourage it. It is also important to match the signature on the endorsement with the name written on the front of the check, and to write clearly and legibly when endorsing.
How do you endorse a check? Everything you need to know is explained below.
Steps to Endorse a Check
Check endorsements can vary depending on the objective for which the check is issued. The question, then, is “how do you endorse a check in this situation?”
Generally, for a financial institution to accept the check:
- The check must contain the payee’s name on the front.
- The front must have a face value, both in words and numbers.
- It should have an appropriate endorsement on the reverse.
- The remitter’s signature and a date must be present.
The steps that you follow to correctly endorse the check will depend on the objective and type of endorsement. Some endorsements only require a signature on the back, while others require specific language and additional information.
Here are some important steps on how to endorse a check properly.
1. Verify the check information: Before endorsing a check, verify that the information is correct, including that it is made out to you, the amount is accurate, and it is a valid check. Look for any errors or discrepancies that need to be addressed before endorsing.
2. Confirm who should endorse the check: Check the payee information to see who should sign the check. When a check is payable to multiple parties, the words "and" or "or" on the payee line determine whether both parties or just one party needs to endorse the check.
3. Sign the check: Turn the check over and look for the designated endorsement area. This area is usually a blank space, often marked with the words "Endorse Here" or "Sign Here." Use a pen with black or blue ink and sign your name exactly as it appears on the front of the check. Make sure the signatures match to avoid any issues when cashing the check.
Types of Endorsements
Here are some of the most common types of endorsements and the steps needed to complete them:

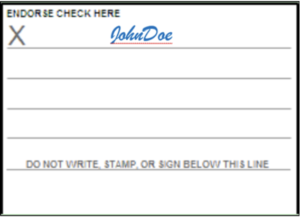
Blank Endorsement
The term blank is a bit of a misnomer, as it seems to indicate that the check contains no endorsement. However, as we see from the image on the right, the remitter does endorse the reverse of the check, but since there are no additional instructions (left blank), it’s called a blank endorsement.
Blank endorsements are the most common type of check endorsement. You typically use this type of endorsement to cash or deposit checks yourself, or to give it to someone else to cash or deposit.
- The payee signs his/her name on the reverse of the endorsed check.
- Be sure the signature matches the one on the front of the check.
Caution: Anyone in physical possession of a blank endorsed check can negotiate it.
Restrictive Endorsement
Restrictive endorsements limit check deposit options. Restrictive endorsements are a safe method to use. This endorsement prevents anyone else, other than the intended payees, from negotiating (or cashing) the check.
To perform a restrictive endorsement:

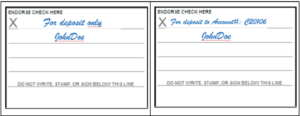
- Write the phrase “for deposit only” or “for deposit to account number” and/or specify your preferred account.
- Sign your name on the next line, ensuring the signature matches the name on the front of the check.
Special Endorsement
A special endorsement is commonly used to pay contractors or third parties for services rendered.
An example might be when your insurance company (remitter) issues a check to you (payee) and you then need to endorse it to an auto body shop (third party) for work done on your car.
To create a special endorsement:

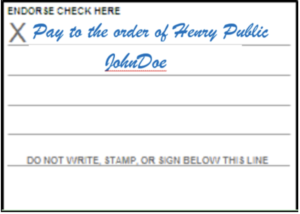
- Write “pay to the order of…” and name the person/institution who will receive the money.
- Next, sign your name below as it appears in the signature on the face of the check.
Unlike a blank check, a special endorsement check enables only the person/institution whose name appears on the endorsement to deposit or cash it.
Mobile Deposit Endorsement
In 2018, new banking regulations mandated the endorsement of electronically-deposited checks using Remote Deposit Capture (RDC) technology.

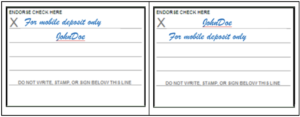
To endorse a check for mobile payment:
- Include the phrase “for mobile deposit only” as part of the endorsement.
Depending on specific guidelines enforced by each financial institution, this endorsement phrase may be included above your signature or below your signature.
Although some checks have a pre-printed checkbox indicating mobile deposit, the endorsement process isn’t legally complete until you write the phrase “for mobile deposit only” on the back of the check.
Qualified Endorsement vs. Conditional Endorsement
There are still a couple of other endorsement options: qualified endorsement and conditional endorsement. Understanding the nuances between the two is important, as it can have significant implications on your choices as a consumer.
- Qualified endorsement: This type of check endorsement passes title of the check to the payee, but with certain conditions/restrictions. You qualify the check by writing the words “without recourse” in the endorsement area. Qualified endorsements typically absolve the endorser from the responsibility of payment if, for any reason, the check is not honored.
- Conditional endorsement: This type of check endorsement sets out specific conditions, on the back of the check, for the payment of the check. For instance, the check might say, “Payable to Henry Public upon satisfactory completion of home renovation.” Before accepting the check (or cashing it) the financial institution may ask for proof that the payee has complied with the condition endorsed.
Although these last two endorsements are common in business transactions, financial institutions usually have restrictive language in their Terms of Service (ToS) documents. Because of the added level of diligence placed on bank staff to validate and verify the endorsements, bank tellers have a fair degree of latitude for rejecting such checks.
Endorse with Confidence
How do you endorse a check? Now, you have all the tools you need to do it right. Next time you take an old school check in your hand, review its purpose and determine the proper endorsement. Your kids might ask, “what is the correct way to endorse a check?,” and you can enlighten them using this information. Knowing how to endorse a check is part of personal finance management. Use our guide to review all the endorsement types and endorse your next check with confidence.
Hire a Pro: Compare Financial Advisors In Your Area
Finding the right financial advisor that fits your needs doesn't have to be hard. SmartAsset's free tool matches you with fiduciary financial advisors in your area in 5 minutes. Each advisor has been vetted by SmartAsset and is legally bound to act in your best interests. If you're ready to be matched with local advisors that will help you achieve your financial goals, get started now.